Singapore
 Australia
 Indonesia
 Japan
Japan Malaysia
 New Zealand
 Philippines
 South Korea
 Taiwan
 Thailand
 VIETNAM
Thinking about getting a custom container built? It’s a smart move if you need something specific for your business or project. But before you jump in and start talking to builders, there are a few things you really need to sort out. Getting these details clear upfront can save you a lot of headaches, time, and money down the road. It’s all about making sure the custom container you end up with actually does what you need it to do, without any surprises.
Key Takeaways
- Figure out exactly what the custom container will be used for. Is it for storing things, moving them, or something else entirely? Knowing the main job it needs to do is step one.
- Think about the shape, size, and any special features you might need. Does it need shelves, specific flooring, or maybe to fit into a tight spot? Plan out the design details.
- Where will this custom container live? Consider the location, how easy it will be to get it there, and if the ground can handle its weight. Site prep is important.
- What’s your budget? Be upfront about how much you can spend. Also, think about if you need insulation, refrigeration, or stronger walls, and how that fits into your budget.
- Check local rules and get any necessary permits. You don’t want to start building only to find out you needed official permission first.
Define The Purpose Of Your Custom Container
Before you even start thinking about steel thickness or door placement, you really need to get clear on why you need a custom container in the first place. What job is this customised container going to do for you? Is it for storing large equipment, setting up a temporary workspace on a job site, or maybe creating a unique pop-up shop? Pinpointing the main function is the very first step. Think about what a standard container just can’t handle for your current needs. Maybe you’re tired of items shifting around during transport, or you need a specific environment inside. Getting this part sorted will guide every other choice you make. It’s about making sure your customised container is actually useful, not just another metal box.
Clarify The Primary Function
This is the core question. What problem are you trying to solve with a custom container? Knowing this will dictate everything from the materials used to the internal layout. For example, if you need to store sensitive electronics, you’ll need to think about climate control and vibration dampening. If it’s for housing tools and machinery on a remote site, durability and security will be top priorities. Don’t just think about what it will hold, but also how it will be used day-to-day.
Determine If Usage Is Temporary Or Permanent
This might seem straightforward, but it significantly impacts the build. If you need a temporary setup, perhaps for a construction project lasting only a few months, you might choose simpler modifications. However, if this customised container is intended to be a long-term solution – maybe a permanent office space, a secure storage facility, or even a small dwelling – you’ll want to invest in more robust features. Longevity, weather resistance, and ease of maintenance become much bigger factors for permanent installations. It’s a balance between initial cost and long-term value.
Identify Specific Material Handling Needs
Understanding how you’ll interact with the container’s contents is key. This includes not just loading and unloading, but also how you’ll access items once they are inside. Think about workflow efficiency and safety. How will things get in and out of your container? This is a big one that often gets overlooked. Consider the weight and size of the items you’ll be moving. Do you need reinforced flooring to handle heavy machinery? Perhaps special ramps or even a built-in lift system? Maybe you’re dealing with delicate items that require specific loading procedures to prevent damage. Thinking about forklifts, pallet jacks, or even manual labor will help you specify the right features for your creative container. It’s all about making the workflow as smooth as possible.
Getting the primary function and usage duration clear upfront helps avoid costly changes later and ensures your container modifications truly serve their intended purpose.
Plan The Structural And Functional Design
Okay, so you know why you need this custom container and roughly what it’s for. Now comes the fun part: figuring out how it’s actually going to look and work. This isn’t just about slapping some walls on a metal box; it’s about making it do exactly what you need it to do, day in and day out.
Consider Unique Shape Requirements
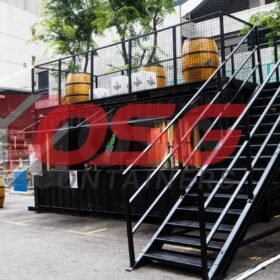
Standard shipping containers are pretty much all the same shape: a rectangle. But maybe your project needs something a bit different. Do you need it to be longer than usual to fit a specific piece of equipment? Or maybe shorter, so it fits better in a tight spot? Sometimes, you might even need specific cutouts for pipes, vents, or access points. Don’t be afraid to think outside the standard box. You might even consider joining two or more containers together to create an L-shape or a U-shape, which could be perfect for a unique workspace or even a small living area. The shape really needs to help with what you’re doing inside, so picture how people or things will move around and if that basic box is truly the best fit.
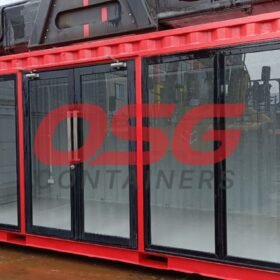
Incorporate Necessary Features Like Shelving Or Flooring
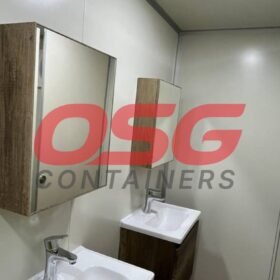
This is where you really make the inside of your container useful. What kind of shelving are you thinking about? Do you need super heavy-duty racks for big industrial parts, or just some simple shelves for tools or office supplies? And what about the floor? A regular container floor might be fine for some things, but if you’re planning on moving heavy machinery around, you’ll definitely want to look into reinforced flooring. Maybe you need a special kind of surface, like something non-slip or easy to clean. And don’t forget about other stuff like making sure there’s good ventilation, enough lighting, or even if you need plumbing if you’re housing equipment that requires it. It’s all about making the inside work as hard as you need it to.
Here are some common features to think about:
- Shelving: From light-duty to heavy-duty industrial racks.
- Flooring: Standard, reinforced, non-slip, or specialized coatings.
- Ventilation: Passive vents, powered fans, or HVAC systems.
- Lighting: Basic interior lights, task lighting, or exterior floodlights.
- Access: Standard doors, roll-up doors, personnel doors, or custom openings.
Evaluate Needs For Environmental Stabilization
Sometimes, what you’re putting inside your container needs a specific environment to stay in good shape. Are you storing sensitive electronics that can’t get too hot or too cold? Or maybe you’re growing plants and need precise temperature and humidity control? If so, you’ll need to think about insulation and climate control systems. This could mean adding spray foam insulation to the walls and ceiling, installing heating and cooling units, or even setting up humidifiers or dehumidifiers. Making sure the inside environment is stable is key for protecting your contents. It might add to the cost, but it’s often way cheaper than replacing damaged goods.
When you’re planning the inside of your custom container, think about how you’ll actually use the space. It’s not just about fitting things in; it’s about making it easy and safe to get to them, move them around, and keep them in good condition. Consider the workflow and any special needs your items might have.
Establish Project Scope And Budget
Alright, let’s talk about the nitty-gritty: money and what you actually want to get done. Before you get too far down the road with fancy designs, you really need to get a handle on your budget and what’s most important for your custom container project. It’s easy to get carried away with all the possibilities, but a clear scope and budget are your anchors.
Communicate Your Budgetary Constraints Early
This is probably the most important thing you can do right off the bat. Don’t wait until the design is almost finished to mention how much you can spend. Your builder or designer needs to know your financial limits from the start. This helps them steer you towards realistic options and avoid wasting time on ideas that are way out of reach. Think of it like planning a road trip – you wouldn’t start driving without knowing how much gas money you have, right?
Discuss What’s Most Important
Once you’ve got a budget in mind, figure out your priorities. What are the absolute must-haves for your container project? Is it a specific look, a certain level of insulation, or maybe a particular layout? Knowing your top priorities helps the design team focus their efforts and find the best solutions within your budget. It’s about making smart trade-offs.
Here’s a quick way to think about it:
- Must-Haves: These are the non-negotiables. The things your project absolutely cannot function without.
- Nice-to-Haves: These would be great if the budget allows, but the project can still succeed without them.
- Dream Features: These are the ‘wouldn’t it be cool if…’ items that are likely outside the current budget but good to keep in mind for the future.
Prioritize Features Within Financial Limits
Most custom projects have different levels of quality or complexity, and these come with different price tags. Don’t be afraid to ask your builder or designer about these tiers. They might have a "good, better, best" kind of setup for things like materials, finishes, or structural reinforcements. Understanding these options helps you make informed decisions about where to spend your money to get the most bang for your buck.
For example, consider these common areas where tiers can apply:
| Feature | Basic Tier | Mid-Tier | Premium Tier |
|---|---|---|---|
| Insulation | Standard Fiberglass | Spray Foam | High-R Value Panels |
| Flooring | Vinyl Composite | LVT | Polished Concrete |
| Exterior Cladding | Painted Steel | Wood Siding | Composite Panels |
| Window Quality | Single Pane | Double Pane | Triple Pane, Low-E |
Being upfront about your budget and priorities from the very beginning is the best way to ensure your custom container project stays on track and meets your expectations without any nasty financial surprises down the line. It sets a realistic tone for the entire process.
Prepare For The Manufacturing Process
So, you’ve got your ideas all lined up and you’re ready to see them become a real thing. This is where the rubber meets the road, so to speak. Getting the manufacturing part right means making sure the people building your custom container have a crystal-clear picture of what you want. It’s not just about saying "build me a box"; it’s about the specifics that make it your box.
Provide Detailed Sketches Or Blueprints
Think of this as your container’s DNA. Even if you’re not an artist, a simple sketch can save a ton of headaches. Grab a piece of paper, a napkin, whatever works, and draw out what you’re imagining. Mark down the dimensions – length, width, height. If you need specific things like dividers, special openings, or mounting points, sketch those too. The more visual information you can give, the better. It helps the design team understand your needs without you having to use a bunch of technical terms.
- Basic Layout: Show the overall shape and size.
- Key Features: Indicate where doors, windows, shelves, or special attachments should go.
- Dimensions: Label all critical measurements clearly.
If you have access to more formal blueprints, even better. But don’t let not having them stop you from getting started. A good manufacturer can work with a range of detail levels.
Specify Dimensions And Key Features
Once you get a quote, it usually comes with a technical drawing or a detailed description of what they plan to build. This is your last chance to catch any misunderstandings before they start cutting metal. Read through everything. Does the drawing match your sketch? Are the materials listed what you discussed? Are the dimensions correct? It’s easy to skim this stuff, especially when you’re excited to get going, but taking the time now prevents costly mistakes later. Imagine ordering a container with a specific opening size, only to find out the drawing shows it a few inches smaller. That’s the kind of thing you want to spot here.
Paperwork might not be the most exciting part, but it’s super important. The drawings, the specifications, the quote – this is the official record of your agreement. The folks on the shop floor build based on these documents. If there’s a typo, a missing detail, or a misinterpretation, it can lead to the wrong thing being built. Make sure you understand what you’re signing off on. Ask questions if anything is unclear. Getting this right upfront means your custom container will be built exactly to your specifications, saving you time, money, and frustration down the line. It’s the blueprint for success, literally.
The manufacturing process relies heavily on the accuracy of the documentation provided. Any ambiguity or error in the sketches, technical drawings, or specifications can lead to the creation of a product that doesn’t meet your requirements. It’s vital to treat this documentation as the definitive guide for construction and to ensure all parties involved have a shared, clear understanding before production commences.
Understand Material Choices
What kind of stuff will be going in and out? If you’re storing smaller items, you’ll probably want shelves. How many? What height? What kind of weight do they need to hold? Maybe you need a specific type of flooring – something heavy-duty that can handle forklifts, or perhaps a non-slip surface for safety. Some projects might even need specialized partitions or dividers to keep different materials separate. It’s worth thinking about how you’ll access everything too; do you need extra doors, or maybe a ramp? The materials used will directly impact the container’s durability, weight, and cost, so discussing these options with your builder is key.
Address Site Preparation And Logistics
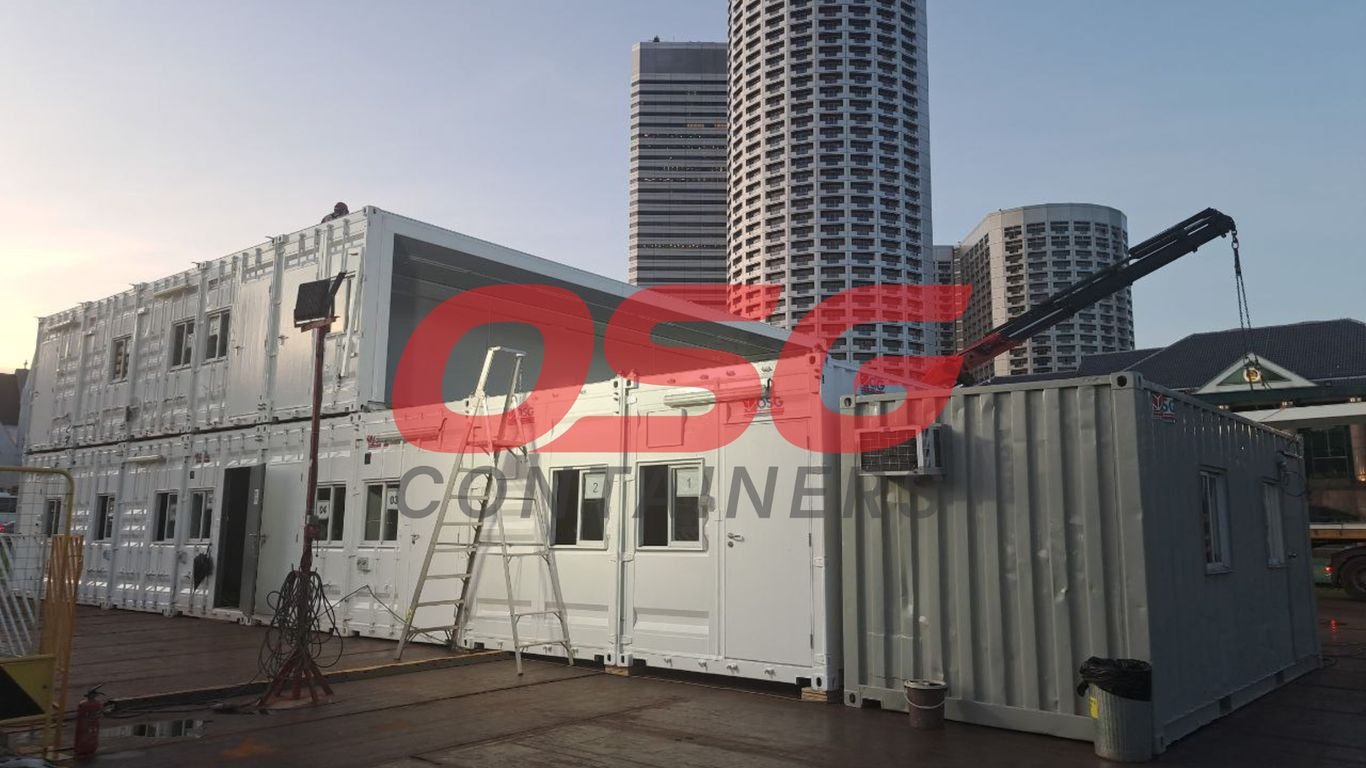
So, you’ve got your custom container design all ironed out, but where is this thing actually going to end up? And how’s it going to get there? This is where we talk about getting your container from the factory to its final spot and making sure the ground it sits on is ready for the job. It’s more than just the container itself; it’s the whole setup.
Assess The Container’s Final Location
First off, think about where this container will live. Is it going to be out in the open, tucked away behind a building, or maybe front and center? You really need to consider a few things:
- Accessibility: Can a big delivery truck actually reach the spot you have in mind? Don’t pick a place that’s too tight or has branches hanging low. A 40-foot container, for example, needs about 130 feet of clear space just to get it dropped off.
- Usability: Once it’s in place, will it be easy to get in and out of? If it’s a workshop, you’ll want room to move around it. If it’s for storage, you might need space for a forklift.
- Environment: Will it be hit by harsh weather? Too much direct sun might not be good for certain items, or maybe you need a spot with good drainage.
The best spot isn’t always the most obvious one. Take a walk around your property with the container’s final use in mind. Imagine yourself using it every day. What would make that experience smooth and frustration-free?
Plan For Transportation And Placement
Getting the container to your site is a whole operation. You need to make sure the path is clear for the truck. This means checking:
- Roads and Driveways: Are they wide enough? Can they handle the weight of a truck carrying a heavy container? Sometimes, you might need to temporarily clear obstacles or even get special permission to use certain routes.
- Turning Radius: Trucks need space to turn. A sharp corner can be a real problem. Measure this out beforehand.
- Overhead Obstructions: Look out for power lines, tree branches, or any other low-hanging stuff that could get in the way.
Here’s a quick look at what to check for delivery access:
| Item | Status (Yes/No/NA) | Notes |
|---|---|---|
| Truck Access Route | Width, clearance, surface condition | |
| Turning Space | At entry and at drop-off location | |
| Overhead Clearance | Power lines, trees, etc. | |
| Drop-off Area | Level, stable, sufficient space | |
| Site Preparation | Any clearing or grading needed? |
Consider Ground Support Requirements
Putting a heavy steel box on soft ground is a recipe for disaster. The ground needs to be able to handle the weight, both of the container itself and whatever you plan to put inside it. The ground should be as level as possible. If it’s not, you’ll need to grade it or use shims to make sure the container sits evenly. An uneven container can warp over time. For long-term placement, especially for heavier loads, you’ll want a compacted base. This could be gravel, concrete, or specialized foundation blocks. This stops the container from sinking and helps spread the weight out evenly.
Ensure Compliance Before Construction Begins
Alright, so you’ve got your ideas all mapped out, maybe even some sketches. That’s awesome! But before anyone starts welding or cutting, we really need to hit pause and talk about the official stuff. It’s not the most glamorous part, I know, but skipping it is like trying to drive without a license – you’ll eventually get caught, and it’ll cost you way more than just a fine.
Research Local Regulations And Permits
Every town, city, and county has its own rulebook. These are your local building codes, and they’re designed to keep things safe. We’re talking about fire safety, how sturdy the structure needs to be, and even how water should drain away. You’ll want to find out what these rules are for your specific location. Sometimes they’re online, other times you might need to make a trip to the local planning or building department. It’s a bit of detective work, but knowing these rules upfront means you won’t design something that’s a complete non-starter.
Understand Permit Conditions
Once you know the rules, you need to get the official ‘go ahead.’ This usually means applying for permits. The process often involves submitting your plans – those detailed drawings we talked about – to the local authorities. They’ll review them to make sure everything lines up with the codes. This can take a little while, and there’s usually a fee. Don’t even think about starting any actual building until you have these permits in your hand. It’s the official permission slip.
Confirm Builder’s Experience With Codes
It’s a good idea to ask your container modification company if they’ve dealt with permits in your area before. They might be able to help with the application or at least provide the drawings the officials need. Some modifications, like cutting into the main supports without proper reinforcement, can mess with the container’s strength and are often a big no-no according to building codes. Make sure your builder knows what they’re doing when it comes to these regulations.
Remember, some modifications might be considered minor, while others could require full building permits, especially if you’re adding plumbing or significant electrical work. It’s best to get this sorted out early to avoid costly delays or having to redo work.
Here’s a quick rundown of what you might need to check:
- Local Building Codes: What are the specific requirements for structures in your area?
- Permit Applications: What forms do you need to fill out?
- Review Fees: How much will permits and inspections cost?
- Inspection Schedule: When will inspectors need to visit the site?
Getting this paperwork sorted before construction starts is key. It saves a lot of headaches and potential fines down the road. Keep copies of all your permits and approved plans on site, too, because inspectors might want to see them during the build.
Wrapping Up Your Custom Container Project
So, you’ve done your homework and figured out all the important details before diving into a custom container build. That’s a huge step! Remember, getting clear on what you need, how it’ll be used, and what your budget looks like from the get-go makes a world of difference. It’s not just about getting a container; it’s about getting the right tool for your specific job. Taking the time to sort out these details upfront means fewer headaches later and a container that actually works for you. Don’t be afraid to ask questions – the people building it want to make sure you get exactly what you’re after. Good luck with your project!
Frequently Asked Questions
Why do I need a custom container instead of a regular one?
A regular container is like a basic box. A custom container is built specifically for what you need it to do. Maybe you need it to store special equipment, work as a small shop, or keep things at a certain temperature. A custom one is made just for that job, making things easier and better.
What’s the first thing I should figure out?
The very first thing is to know exactly why you need the container. What is its main job? Is it for storing stuff, moving it, or using it as a workspace? Knowing its main purpose helps decide everything else, like its size and what features it needs.
How important is the container’s location?
It’s pretty important! You need to think about where the container will end up. Can the ground there hold its weight? How will you get it there? Planning the spot and how it will arrive makes sure everything goes smoothly when it’s time to put it in place.
Should I tell the builder my budget right away?
Yes, definitely! It’s best to be honest about how much money you have to spend from the start. This helps the builder suggest ideas that fit your budget and avoids wasting time on things you can’t afford. It keeps the project on track financially.
Do I need to give the builder exact drawings?
You don’t have to be a pro artist, but a simple drawing or sketch is super helpful. It shows the builder what you’re imagining, like where doors or shelves should go. The more details you can show, the better they can build exactly what you want.
What if the rules in my town are tricky?
You need to check local rules and get any needed permission before building. Sometimes, permits have special rules you must follow. Talking to your builder about this can help make sure your container project follows all the laws and avoids problems later.