Singapore
 Australia
 Indonesia
 Japan
Japan Malaysia
 New Zealand
 Philippines
 South Korea
 Taiwan
 Thailand
 VIETNAM
So, you’re looking to get a container for a project. Maybe it’s for storage, maybe something bigger. It seems simple enough, right? Just find a place that sells them. But honestly, picking the right container and, more importantly, the right container supplier can make a huge difference. You don’t want to end up with something that doesn’t fit your needs or a supplier who makes the whole process a headache. Let’s break down how to find a good container supplier and get the right box for whatever you’re doing.
Key Takeaways
- Figure out exactly what you need the container for, how big it needs to be, and what type will work best before you even start looking.
- Decide if a brand-new container or a used one makes more sense for your budget and how long you’ll use it. Always check the condition carefully.
- Finding a trustworthy container supplier is key. Do some online searching, read reviews, and understand their policies on warranties and returns.
- Don’t forget to think about special container types if your project has unique needs, like odd-sized items or temperature control.
- Factor in all the costs, including the container itself, delivery, and any changes you want to make, and make sure your site is ready for delivery.
Understanding Your Project Needs
Before you even start looking at suppliers or fancy container features, you gotta figure out what you actually need the container for. It sounds obvious, right? But seriously, this is where most people trip up. Getting this part wrong means you might end up with a container that’s way too small, too big, or just not the right kind for the job. That’s a headache and a money pit you don’t want.
Defining Your Container’s Purpose
So, what’s the container going to do? Is it for storing tools on a construction site? Maybe it’s going to be a temporary office? Or perhaps you’re thinking of turning it into a backyard workshop or even a small business space? The intended use is the biggest factor. A container for storing old furniture needs different features than one that will house sensitive equipment or be modified into a living space. Think about what will go inside, how often it’ll be accessed, and if it needs to be protected from the weather or prying eyes.
Determining the Right Size
This is a big one. Nobody wants to rent a container only to find out it’s too small halfway through the project. On the flip side, paying for a massive container when you only need a little space is just wasteful. You need to estimate the volume of stuff you’ll be putting in it. For smaller jobs like cleaning out a garage or a single room renovation, a 10-yard or 15-yard container might be plenty. Bigger projects, like major renovations or demolition, often need a 20-yard or even a 40-yard container. It’s usually better to err on the side of slightly too big than too small. You don’t want to be stuck with overflowing junk.
Here’s a rough guide:
| Project Type | Suggested Container Size |
|---|---|
| Garage cleanout, small repairs | 10-15 cubic yards |
| Multi-room renovation | 20 cubic yards |
| Major construction, demolition | 30-40 cubic yards |
| On-site storage (tools/equip) | 20-foot storage container |
Selecting the Appropriate Container Type
Containers aren’t all the same. Most commonly, you’ll see standard shipping containers, which are pretty robust. But what if your project involves liquids, chemicals, or other materials that could leak? You’ll need a specialized, watertight container for that. These are built to keep everything sealed up tight, which is important for safety and environmental reasons. If you’re just using it for storage, a standard, weather-resistant model is probably fine. Some containers also come with extra ventilation, which is good if you’re storing things that could get moldy or if the container will be in direct sun a lot.
Figuring out your needs upfront saves a ton of hassle later. It’s like packing for a trip – if you forget something important, you’ll regret it.
Don’t just guess your way through this. Take a good, hard look at what you’re trying to accomplish. The more you know about your project’s requirements, the easier it will be to find a container that actually works for you.
Evaluating Container Condition and Features
So, you’ve figured out what you need the container for and what size it should be. Now comes the part where you actually look at the container itself. It’s not just about picking one that looks okay; there are some real differences to consider, especially when it comes to how it’s held up.
New Versus Used Containers
This is a big one, and it really comes down to your budget and how long you plan to use the container. New containers, often called ‘one-trip’ containers, have only made one journey from the factory. They’re usually in tip-top shape, with hardly any dents or rust. If you’re building something permanent or need something that will last for ages with minimal fuss, a new one is probably your best bet. On the flip side, used containers have seen a lot more action. They’re cheaper, which is great if you’re on a tight budget or only need it for a short while. Just be aware that ‘used’ can mean anything from ‘a few scratches’ to ‘seen better days’.
- New (One-Trip): Best condition, minimal wear, ideal for long-term projects.
- Used (Cargo-Worthy): Structurally sound but with cosmetic wear; more budget-friendly.
- Refurbished: Used containers that have been repaired and repainted; a middle ground.
Assessing Structural Integrity
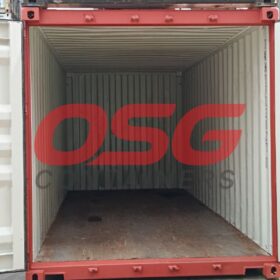
No matter if it’s new or used, you absolutely have to check the container’s bones. You want to make sure the frame is solid and that it doesn’t have any major dents or bends. Look at the corners, especially where the roof meets the sides, as this is where rust can start to build up if water pools. Open and close the doors – they should move smoothly without too much effort. Check the rubber seals around the doors; they need to be intact to keep the inside dry. Give the roof a good look too, checking for any signs of rust or damage.
When inspecting, don’t just glance. Get up close. Check the floor for any soft spots or damage. A quick sniff inside can also tell you if it previously held anything with a strong odor that might linger.
Considering Material and Special Features
Most containers are made of steel, which is tough and durable. Some might be aluminum, which is lighter but might not hold up as well in harsh weather if you’re just using it for storage. Think about what you’ll be doing with it. Do you need it to be watertight? Does it need special insulation? Maybe you need it to be refrigerated? These are features that can add to the cost, but they might be non-negotiable depending on your project. Some suppliers can add these features, but it’s often easier and sometimes cheaper to find a container that already has what you need.
Finding a Reputable Container Supplier
So, you’ve figured out what kind of container you need, its size, and whether new or used is the way to go. Awesome. Now comes the part where you actually find someone to buy it from. This step is pretty important, honestly. Getting your container from a shady dealer can turn a smooth project into a total headache. It’s like buying a used car – you gotta do your homework.
Conducting an Online Search
Your first stop is probably the internet. A quick search for terms like "buy a sea container" or "second hand office containers for sale" will bring up a bunch of options. Look for companies that have professional-looking websites. That’s usually a good sign. Check if they list their prices clearly and if they have straightforward policies about returns or issues. If a website looks like it was made in 1998 and has no contact info, maybe keep looking.
Checking Supplier Reputation and Reviews
Once you’ve got a few potential suppliers, it’s time to see what other people are saying about them. Look for reviews on their website, Google, or other independent sites. Are customers happy with the quality of the containers? Was delivery on time? Did the company handle problems well? A supplier with a lot of positive feedback is usually a safe bet. On the flip side, if you see a pattern of complaints about damaged goods or poor service, it’s probably best to steer clear.
Here’s a quick checklist for evaluating a supplier:
- Website Professionalism: Does it look legitimate and easy to use?
- Customer Reviews: What are past buyers saying?
- Transparency: Are prices and policies clear?
- Communication: Do they respond to inquiries promptly?
Understanding Warranty and Return Policies
This is a big one. What happens if the container arrives and it’s not what you expected, or worse, it’s damaged? A good supplier will have a clear warranty policy. This protects you if something goes wrong. Ask about their return policy too. Some suppliers might offer a money-back guarantee, which is always a nice safety net. Don’t be afraid to ask questions about this before you hand over any cash. It’s better to be safe than sorry, right?
Always get everything in writing. Verbal agreements can get lost in translation, and you don’t want to be stuck with a container that doesn’t meet your needs because of a misunderstanding. A solid contract or purchase order protects both you and the supplier.
Exploring Specialty Container Options
So, you’ve looked at the standard stuff – the regular dry vans, maybe a high-cube if you need a bit more headroom. But what if your project is a little… different? That’s where specialty containers come in. These aren’t your everyday boxes; they’re designed for specific jobs that a regular container just can’t handle. Think of them as the Swiss Army knives of the container world.
Identifying Unique Use-Case Containers
Sometimes, the cargo you’re moving or the space you’re creating just doesn’t fit the mold. Maybe you’re hauling something really tall, or perhaps you need easy access from the side. Standard containers have doors on one end, which is fine for a lot of things, but not everything. For instance, if you’re loading up heavy machinery, an open-top container with a removable roof makes that job way easier than trying to stuff it through a standard door. Or, if you need to get stuff in and out quickly from both ends, a double-door container is a game-changer. These aren’t as common as the regular ones, and you might find them more often in the used containers market, but they solve specific problems.
Understanding Specialty Container Designs
Let’s break down a few of these specialized designs:
- Open-Top Containers: These are great for oversized cargo that needs to be loaded from above. The roof is usually a tarp that can be removed.
- Double-Door Containers: Also called ‘tunnel containers,’ these have doors on both ends, making it super convenient for drive-through loading and unloading.
- Half-Height Containers: Shorter than standard containers, these are perfect for dense, heavy materials like coal or scrap metal. They’re easier to handle and stack.
- Open-Side Containers: These have large, sliding doors along one entire side, giving you full access to the contents. Ideal for bulky items that need easy side access.
While new specialty containers are available, they can be pricier and harder to find. Often, the best way to get your hands on these unique units is by looking for used containers that have been adapted or were originally built for a specific purpose. Just be sure to inspect them thoroughly, especially if they’re not ‘one-trip’ models.
Consulting Specialty Unit Guides
Finding the right specialty container can feel like a treasure hunt. It’s not always as straightforward as picking a 20-foot or 40-foot standard box. Many suppliers have guides or sections on their websites dedicated to these less common types. These guides often break down the dimensions, typical uses, and even suggest which types are best for certain industries or projects. If you’re unsure, don’t hesitate to reach out to the supplier directly. They can help you figure out if a customised container is needed or if one of these specialty options will fit the bill. It’s always better to ask than to end up with a container that doesn’t quite do the job.
Budgeting for Your Container Purchase
Okay, so you’ve figured out what kind of container you need and what size it should be. Now comes the part that can make or break your project: the money. It’s easy to get excited about the possibilities, but you really need to get a handle on the costs involved before you sign anything.
Understanding Base Container Costs
The price tag on a container isn’t just one number. It depends a lot on whether you’re looking at a brand-new unit or a used one. New containers, naturally, cost more. They haven’t been through the wringer, so you’re getting top-notch condition and usually a longer lifespan. Used containers can be a real money-saver, but you’ve got to be careful. You’ll want to know what it was used for before. If it hauled chemicals, you might have lingering smells or residue that’s tough to get rid of. Plus, condition varies wildly, so inspect it closely.
Here’s a rough idea of what you might see, but remember, these are just ballpark figures and can change:
| Container Type | Condition | Approximate Price Range |
|---|---|---|
| 20-foot | Used | $2,000 – $3,500 |
| 20-foot | New | $3,500 – $5,000 |
| 40-foot | Used | $2,500 – $4,500 |
| 40-foot | New | $4,500 – $7,000 |
Factoring in Delivery and Unloading Fees
Don’t forget that the container isn’t going to magically appear at your doorstep. Delivery fees are a big one, and they can add up fast depending on how far away you are from the supplier’s yard. Some suppliers might even charge extra if the delivery truck needs special equipment to get to your site, like a crane for tricky spots. And once it’s there? You’ll likely need to pay for unloading too, unless you have the right equipment and know-how yourself. Always ask for a full quote that includes these delivery and unloading charges upfront.
It’s always a good idea to get a few quotes from different suppliers. Don’t be afraid to ask questions about what’s included and what’s not. Sometimes, there’s a little wiggle room on pricing, especially if you’re buying multiple units or have a straightforward delivery.
Evaluating Costs for Customization
If you’re planning on turning your container into an office, a workshop, or even a tiny home, customization is where the costs can really start to climb. Think about what you need:
- Windows and Doors: Adding extra openings isn’t free. The more you add, the more it costs.
- Insulation and Interior Walls: If you want it comfortable and finished inside, you’ll need insulation, framing, and wall coverings. This can be a significant expense.
- Electrical and Plumbing: Running power or water into your container requires professional work and materials.
- Flooring: Basic containers have simple metal floors. You might want something more durable or attractive, which means extra cost.
- Painting: While you can paint it yourself, professional painting, especially for specific colors or finishes, adds to the bill.
When you’re talking to suppliers about modifications, get detailed quotes for each item. It’s better to have a clear breakdown so you know exactly where your money is going.
Logistics of Container Delivery and Placement
So, you’ve picked out the perfect container. Awesome! Now comes the part where it actually gets to your place. This isn’t usually a ‘just show up’ kind of deal. You’ve got to think about how the truck’s going to get to your spot and, more importantly, how it’s going to get the container off. It’s not like the delivery guy can just toss it over the fence.
Assessing Site Accessibility for Delivery
First things first, can the truck even get there? Think about narrow driveways, low-hanging branches, or tight turns. A standard 40-foot container delivery truck needs a good amount of room to maneuver. If your site is a bit tricky, you might need to arrange for a smaller truck or even a specialized delivery method. Some companies will ask you to fill out a delivery questionnaire, maybe even send photos of your site, so they know what they’re dealing with. It’s all about making sure the big rig can reach the drop-off zone without a hitch.
Understanding Local Placement Regulations
Don’t just assume you can plop a container anywhere. Your local town or city probably has rules about where you can put things like this. Are there permits needed? Are there limits on how long it can stay? Some places might have rules about how close it can be to property lines. It’s a good idea to check with your local planning or building department before you order. You don’t want to get a surprise notice telling you to move your brand-new storage unit.
Planning for Safe Container Unloading
How the container actually gets off the truck is a big deal. There are a few ways this usually happens:
- Tilt-Bed Truck: This is often the easiest. The truck tilts back, and the container just slides off. Pretty straightforward.
- Flat-Bed Truck: This one usually needs some help. You’ll likely need a forklift or a crane on-site to lift the container off the truck and put it where you want it.
- Pick-Up Truck (with specialized trailer): Sometimes, a smaller truck can bring it, but you’ll still need equipment to get it off.
The method chosen really depends on your site and what equipment you have access to. If you’re not sure, talk to the supplier. They can usually guide you on the best and safest way to get it unloaded. It’s better to figure this out beforehand than to have a container stuck halfway off a truck.
Getting the container to your property is more than just a delivery; it’s a logistical puzzle. Thinking through the access, the local rules, and the unloading process beforehand saves a lot of headaches and potential extra costs down the line. It’s about making sure that big metal box ends up exactly where you want it, safely and legally.
Customization and Modifications
So, you’ve picked out the perfect container, but it’s not quite ready for prime time, right? That’s where customization and modifications come in. Think of it like buying a house – the basic structure is there, but you’ll want to add your own touches to make it truly yours. Whether you’re turning a container into an office, a workshop, or even a tiny home, tweaking it to fit your exact needs is a big part of the process.
Identifying Necessary Modifications
Before you start dreaming up fancy additions, it’s smart to figure out what you actually need. What’s the container going to be used for? This is the most important question. If it’s just for storing garden tools, maybe you only need a better lock. But if you’re planning to work in it, you’ll need to think bigger.
Here are some common things people add:
- Doors and Windows: For easy access and some fresh air. You might need more than the standard cargo doors.
- Insulation: This is a big one if you plan to spend any real time inside, especially if the weather gets extreme. It makes a huge difference in comfort.
- Electrical and Plumbing: If you need lights, outlets, or running water, this is where you’ll need to get it installed.
- Ventilation: Especially important for enclosed spaces to keep the air fresh and prevent moisture buildup.
Working with Suppliers for Customization
Most container suppliers can handle these modifications for you. It’s usually easier and sometimes cheaper to have them do it before the container is delivered, especially for structural changes. They have the tools and the know-how.
When you talk to a supplier about custom work, be super clear about what you want. Draw it out if you have to. Ask them about:
- Their experience: Have they done this kind of work before?
- Materials used: Are they using quality stuff?
- Timeline: How long will the modifications take?
- Cost breakdown: Make sure you know exactly what you’re paying for.
It’s always a good idea to get a written quote that details all the modifications, materials, and the final price. This way, there are no surprises later on.
Considering Interior Finishing Options
Once the big structural stuff is done, you can think about making the inside look and feel nice. This is where it starts to feel like your own space.
- Flooring: You can go with simple plywood, vinyl, or even tile, depending on how much wear and tear it will get.
- Wall Coverings: Options range from basic painted drywall to wood paneling or even specialized insulation boards.
- Ceiling: Similar to walls, you can paint it, add panels, or leave it as is if it looks okay.
Think about how you’ll use the space day-to-day. If it’s a busy workshop, you’ll want durable, easy-to-clean surfaces. If it’s a quiet office, you might prioritize aesthetics and comfort. Don’t forget to factor in the cost and time for these finishing touches when you’re planning your project budget.
Wrapping It Up
So, picking the right container supplier isn’t just about finding the cheapest box. It’s about really thinking through what you need – the size, the type, and even how it looks. Don’t forget to check out the supplier’s reputation and make sure they’re upfront about everything, like delivery costs and any warranties. Taking a little extra time now to do your homework means you’ll end up with a container that actually works for your project, saving you headaches and maybe even some cash down the line. It’s a big purchase, so make sure it’s the right one.
Frequently Asked Questions
What’s the first thing I should figure out before buying a container?
Before you even start looking at containers, you need to know exactly what you’ll use it for. Will it be for storing stuff, moving things, or maybe building something cool? Knowing the main job of the container helps you pick the right size and type.
How do I know what size container I need?
Containers usually come in 20-foot and 40-foot lengths. Think about how much stuff you have or how big your project is. It’s usually better to get one that’s a little bigger than you think you need, just in case things pile up or you need extra room.
Should I buy a new container or a used one?
New containers are in great shape and last a long time, perfect for building projects. Used containers are cheaper, which is good for simple storage if a few scratches don’t matter. Just make sure you know what the used container held before, especially if it was chemicals.
What are ‘specialty’ containers?
These are containers made for specific jobs that regular ones can’t handle easily. Think of ones with open tops for tall things, double doors for faster loading, or half-height ones for really heavy stuff like rocks. They’re less common but super useful for certain projects.
What extra costs should I expect besides the container price?
Besides the price of the container itself, you’ll likely have to pay for delivery to your location. Sometimes, they also charge extra for unloading it. If you want to change the container, like adding windows or special flooring, that’s another cost too.
How do I make sure the container gets to my site okay?
You need to check if the place where the container will go is easy for a big truck to get to. Also, look into any local rules about where you can put a container on your property. Planning how they’ll safely drop it off is important.